When it comes to home décor, wall cladding might not be the first thing that comes to mind. Often associated with exterior home improvement, it is a versatile and stylish option for indoor spaces as well. If you’re looking to enhance the aesthetic appeal of your home, add texture, or want a change from plain painted walls, this might be the perfect solution.
What is Wall Cladding?
Covering one material with another for decorative or functional purposes. Cladding can be made from wood, stone, brick, metal, and even PVC. It’s often used on the exterior of buildings to protect against the elements, but its indoor applications are just as diverse and exciting.
Types of Indoor Wall Cladding
1. Wood Cladding
– Shiplap: These long planks overlap at the edges, creating a clean, horizontal look. Shiplap is popular in farmhouse-style interiors.
– Tongue and Groove: This type of wood cladding fits together seamlessly, making it ideal for creating smooth, continuous surfaces.
– Reclaimed Wood: Using old, recycled wood can add a rustic charm to any room. Each piece has its own character and history.
2. Stone Cladding
– Natural Stone: This includes materials like slate, marble, or granite. Natural stone brings a touch of luxury.
– Stone Veneer: A lighter and more cost-effective alternative to natural stone, stone veneer mimics the appearance of real stone.
3. Brick Cladding
– Exposed Brick: Exposed brick cladding is a great option for an industrial or urban look. It adds texture and a sense of history.
– Brick Veneer: Like stone veneer, brick veneer offers the aesthetic of actual brick without the weight and expense.
4. Metal Cladding
– Corrugated Metal: Adds a modern, edgy feel to a room. Often used in loft apartments or contemporary spaces.
– Tin Tiles: Can create vintage, decorative ceilings or walls.
5. PVC and Composite Cladding
– PVC Panels: These are lightweight, waterproof, and easy to install. Great for bathrooms and kitchens.
– Composite Panels: Made from a mix of materials, these panels can offer the look of wood or stone while being more durable and easier to maintain.
Creative Uses of Wall Cladding Indoors
Now that we’ve covered the types of wall cladding let’s look at how you can use them creatively to enhance your indoor spaces.
1. Accent Walls
Probably the most popular use of wall cladding indoors is for creating accent walls. An accent wall can transform an otherwise plain room into a stylish and inviting space. For example:
– Living Room: A reclaimed wood accent wall behind your sofa can add warmth and a focal point.
– Bedroom: A stone veneer wall behind the bed can create a dramatic and luxurious backdrop.
– Home Office: Brick cladding can give your workspace a professional and sophisticated look.
2. Feature Ceilings
Ceilings are often overlooked in home décor but offer a great canvas for creative expression. Cladding your ceiling can add character and depth to a room.
– Tin Tiles: Use tin tiles in kitchens or dining rooms for a vintage look.
– Wooden Beams: Adding wooden beams or wood cladding can give a room a cozy, cabin-like feel.
3. Bathroom Bliss
Wall cladding is an excellent choice for bathrooms because it is durable and moisture-resistant.
– PVC Panels: Ideal for shower enclosures or entire walls due to their waterproof nature.
– Stone Cladding: Natural stone or stone veneer can create a spa-like atmosphere, perfect for relaxation.
4. Kitchen Backsplashes
Instead of traditional tiles, consider using wall cladding for your kitchen backsplash.
– Brick Veneer: Adds a rustic, farmhouse feel.
– Metal Cladding: Stainless steel or copper cladding can give a sleek, modern appearance.
5. Hallway and Staircase Statements
Hallways and staircases are often high-traffic areas that call for the durability and style of wall cladding.
– Wood Cladding: Shiplap or tongue and groove panels can make narrow hallways feel more spacious and inviting.
– Stone or Brick Cladding: Adds texture and visual interest, making these often-overlooked spaces more engaging.
Benefits of Using Wall Cladding Indoors
1. Aesthetic Appeal: Wall cladding adds texture, depth, and character to your interiors, transforming plain walls into eye-catching features.
2. Durability: Cladding materials like stone, brick, and composite panels are highly durable, protecting walls from wear and tear.
3. Insulation: Certain types can provide extra insulation.
4. Easy Maintenance: Materials are easy to clean and maintain.
5. Value Addition: Can increase your home’s aesthetic value, potentially boosting its market value.
Installation Tips
While some wall cladding projects can be DIY-friendly, others might require professional installation, especially if you’re dealing with heavy materials like stone or need a waterproof seal in wet areas. Here are a few tips for a successful installation:
– Preparation: Ensure the wall surface is clean, dry, and smooth before starting.
– Measuring: Accurate measurements are crucial. Measure twice and cut once to avoid mistakes.
– Adhesives and Fixings: Use the appropriate adhesives and fixings for your cladding material.
– Professional Help: Be open to seeking professional help for complex or large-scale projects.
Conclusion
Whether you prefer timber, the elegance of natural stone, or the modern edge of metal cladding, there’s a style to suit every taste and room. By exploring the various types and creative uses, you can transform your home into a stylish, inviting haven that reflects your unique personality and style. So, why not see how wall cladding can enhance your interiors?
View our full range of Wall Cladding products
New styles added regularly!
When building or renovating a garden shed, one of the most important decisions you’ll make is selecting the right cladding. That is the exterior material that covers and protects the shed’s structure, and it plays a critical role in the shed’s durability, appearance, and overall functionality. In this post, we’ll explore the different types available, their benefits and drawbacks, and how to choose the right one for your garden shed.
Understanding Cladding
Cladding serves several essential purposes:
- 1. Protection: It shields the shed from weather elements like rain, wind, and sun.
- 2. Insulation: It helps to maintain a stable internal temperature.
- 3. Aesthetics: It determines the shed’s visual appeal.
Choosing the correct one involves balancing these factors according to your needs and preferences.
Types of Cladding
There are several popular options for garden sheds, each with advantages and disadvantages. Let’s take a closer look at the most common types:
1. Timber Cladding
Pros:
- Aesthetic Appeal: Timber cladding provides a natural, rustic look that blends well with garden environments.
- Insulation: Wood offers good thermal insulation properties.
- Versatility: Timber can be painted or stained to match any colour scheme.
Cons:
- Maintenance: Timber requires regular maintenance to prevent rot, insect damage, and weathering.
- Cost: High-quality timber can be expensive. Thankfully here at Panelling Direct our timber cladding is some of the best priced on the market – along with being of the highest quality.
Types of Timber Cladding:
- Overlap Cladding: Boards are placed horizontally, overlapping each other. This method is affordable and provides good weather protection.
- Shiplap Cladding: Boards interlock with a groove, offering a tighter seal and a more polished look.
- Tongue and Groove Cladding: Similar to shiplap but with an interlocking design that ensures maximum protection against moisture.
2. Metal Cladding
Pros:
- Durability: Metal cladding, usually made from steel or aluminium, is highly durable and resistant to weather, rot, and insects.
- Low Maintenance: It requires minimal upkeep compared to timber.
- Security: Metal provides robust protection.
Cons:
- Aesthetics: Metal cladding can look industrial and may not blend as well with garden landscapes.
- Insulation: Metal can be poor at insulating, leading to temperature fluctuations inside the shed.
- Cost: High-quality metal cladding can be expensive.
3. Vinyl Cladding
Pros:
- Affordability: Vinyl is generally less expensive than timber and metal.
- Low Maintenance: Little maintenance is needed, and it is resistant to rot and insects.
- Variety: Available in various colours and styles.
Cons:
- Durability: Vinyl can be less durable than metal and may crack or fade.
- Aesthetics: Some people find vinyl less appealing than natural materials like wood.
- Environmental Impact: Vinyl production and disposal can have negative environmental impacts.
4. Composite Cladding
Pros:
- Durability: Made from wood fibres and plastic, composite cladding is highly durable and resistant to rot and insects.
- Low Maintenance: It requires minimal upkeep.
- Aesthetic Flexibility: Available in various colours and styles, mimicking the appearance of natural wood.
Cons:
- Cost: Composite cladding can be expensive.
- Temperature Sensitivity: It can expand and contract with temperature changes, potentially causing warping.
Factors to Consider When Choosing Cladding
When deciding on the right cladding for your garden shed, consider the following factors:
1. Maintenance
Think about how much time and effort you will put into maintaining your shed. Timber cladding, while beautiful, requires some treatment and care. Metal, vinyl, or composite cladding can be lower maintenance if you are willing to sacrifice the other benefits of timber.
2. Budget
Your budget will heavily influence your cladding choice. While high-quality materials like timber and composite offer excellent durability and aesthetics, they can be costly. Vinyl and overlap timber cladding are more affordable options but may compromise longevity and appearance.
3. Aesthetics
The appearance of your garden shed is an important consideration, especially if it will be a prominent feature in your garden. Think about how the cladding material will look in your specific setting and whether it complements the style of your home/garden.
4. Environmental Impact
Those concerned about the environment should consider the sustainability of the cladding materials. Timber from sustainable sources, recycled metal, and composite materials can be more eco-friendly. Avoiding materials with high environmental costs, like certain types of vinyl, can help reduce your carbon footprint.
Making Your Decision
After weighing the pros and cons of each cladding type and considering the key factors, you should be well-equipped to make an informed decision. Here are a few additional tips to help you finalize your choice:
1. Seek Expert Advice
Feel free to reach out to us here at Panelling Direct. We’ll be happy to offer recommendations based on your specific requirements.
2. Think Long-Term
Consider the long-term implications of your choice. While some materials may be cheaper initially, they may need to be replaced sooner than more durable options.
Garden Shed Wall Cladding: Summary
Picking the best cladding for your garden shed is a super important decision that affects its durability, maintenance, and overall appearance. By understanding the different types of cladding and considering factors like climate, maintenance, budget, aesthetics, and environmental impact, you can select the best material for your needs. Happy building!
View our full range of Wall Cladding products
New styles added regularly!
Rustic home design is all about creating a cosy, warm, and inviting atmosphere. One way to achieve this look is by using log lap wall cladding. This method not only brings nature’s beauty indoors but adds texture and character to any space. This article explores how you can use log lap wall cladding to create a stunning rustic look in your home.
What is Log Lap Wall Cladding?
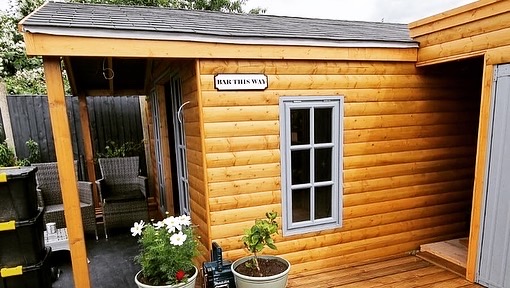
Wooden boards overlapping, creating a seamless and natural look. Log lap can be made from various types of wood, each offering different textures and colours. The overlapping design helps to shed water, making it a popular choice for exterior walls.
Why Choose Log Lap Wall Cladding?
There are several benefits that make it a top choice for creating a rustic look:
1. Natural Aesthetic
Wood has a timeless appeal that brings warmth and charm to any room.
2. Durability
Properly treated wood cladding can last many years, even in harsh weather conditions.
3. Insulation
Wood provides good insulation, helping regulate your home’s temperature.
4. Versatility
Log lap cladding can be used in various spaces, from living rooms to bathrooms.
Preparing for Installation
Before you start installing, there are a few steps to prepare:
Measure the Area: Measure the walls where you plan to install the cladding to determine how much material you need.
Prepare the Surface: Ensure the wall surface is clean, dry, and free of any obstructions.
Gather Tools and Materials: A saw, hammer, nails or screws, a level, and safety gear.
Installing Log Lap Wall Cladding
Here’s a step-by-step guide:
1. Start at the Bottom: Begin installation at the bottom of the wall and work your way up. This helps to ensure each board overlaps correctly.
2. Secure the First Board: Place the first board at the bottom of the wall, ensuring it is level. Secure it in place with nails or screws.
3. Continue with Subsequent Boards: Place the next board above the first, slightly overlapping it. Secure it in place and repeat this process until you reach the top of the wall.
4. Cut to Fit: You may need to cut the boards to fit around windows, doors, and corners. Use a saw to make precise cuts.
5. Seal and Protect: Once all the boards are in place, apply a sealant to protect the wood from moisture and wear.
Finishing Touches
After the installation is complete, add some final touches to enhance the rustic look:
– Staining: Apply a wood stain to enhance the natural colour of the wood. Choose a shade that complements your décor.
– Painting: If you prefer a different look, paint the cladding. Consider earthy tones like brown, green, or grey for a rustic feel.
– Decorative Elements: To complete the look, add rustic elements like vintage signs, wrought iron fixtures, or natural textiles.
Maintenance Tips
To keep your cladding looking its best, follow these maintenance tips:
– Regular Cleaning: Dust the cladding regularly and clean it with a damp cloth.
– Inspect for Damage: Periodically check for any damage, such as cracks or warping, and repair as needed.
– Reapply Sealant: Over time, the sealant may wear off. Reapply it every few years to protect the wood.
Examples of Rustic Spaces with Log Lap Wall Cladding
Here are a few ideas on how to use it different areas of your home:
Living Room
Create a feature wall with log lap cladding behind your sofa or TV. Add a stone fireplace and wooden furniture for a cosy, cabin-like feel.
Bedroom
Use log lap cladding on the wall behind your bed. Pair it with soft, neutral bedding and rustic décor items like lanterns and woven baskets.
Bathroom
Add log lap cladding to one wall in your bathroom for a spa-like atmosphere. Combine it with natural stone tiles and greenery for a fresh look.
Kitchen
Installing it on your kitchen walls adds warmth and texture. Mix it with open shelving and farmhouse-style cabinetry for a charming, rustic kitchen.
Summary: Log Lap Wall Cladding
Log lap wall cladding is an excellent way to take some of the rustic charm of the outdoors inside. Its natural beauty, durability, insulation properties and versatility make it a great choice for creating cosy and inviting spaces. You can transform any room into a rustic retreat by choosing the right wood, preparing correctly, and following the installation steps. With a little maintenance, your log lap cladding will continue to enhance your home’s aesthetic well into the future. Embrace the rustic look and enjoy the warmth and character that log lap wall cladding brings to your space.
View our full range of Wall Cladding products
New styles added regularly!
Creating a cosy, rustic atmosphere in your home is easier than you might think. One of the best ways to achieve this is through interior wall cladding, which adds texture, depth, and warmth to any space. Here are some ideas and tips to help you get that perfect rustic chic look.
Shiplap
Shiplap is a versatile choice for rustic interiors. Its clean, linear look works well in any room. Painted white shiplap gives a fresh, farmhouse feel. For a more rugged look, leave the wood in its natural state.
Shiplap can make your home feel like a cosy cabin. Its horizontal lines add depth to walls. This style is easy to install and works in modern and traditional homes. You can use it in living rooms, bedrooms, or even bathrooms.
Tip: Use shiplap vertically to make ceilings appear higher. Horizontally placed shiplap can make a room feel wider. For a unique look, consider diagonal shiplap, which puts a fun twist on the traditional style.
Shiplap is also great for accent walls. Paint it a different colour from the other walls to make it stand out. You can also use shiplap to cover the entire room for a uniform look. It pairs well with other rustic elements like wooden beams and stone fireplaces.
Board and Batten
Board and batten cladding adds depth and texture to walls. This style involves wide boards placed vertically with narrow battens covering the seams. It’s a classic choice for rustic homes.
Board and batten create a robust and structured look. It’s simple but elegant. This style can make a room feel taller, making it perfect for adding a rustic touch to modern homes.
Tip: Paint board and batten in neutral tones for a calm, cosy space. It works well in bathrooms and bedrooms, adding a touch of elegance. For a bolder look, choose dark colours like navy or charcoal.
Board and batten is also an excellent choice for exteriors. It gives a home a timeless, classic look. Inside, it adds character to hallways, living rooms, and dining areas. It’s also a good option for wainscoting, adding interest to the lower half of your walls.
Tips for Achieving a Rustic Chic Look
1. Mix Materials
Combine different cladding materials to create a layered look. For a balanced design, mix wood with metal. For example, pair shiplap walls with a metal light fixture. This contrast adds depth to your design.
2. Neutral Colours
Stick to neutral tones like whites, beiges, and greys. These colours enhance the rustic feel and make your space calm and inviting. Accessories like pillows and rugs can add hints of colour.
3. Texture
Texture is key in rustic chic design. Choose cladding materials with rich textures to add depth and interest to your walls. Rough wood and smooth metal work well together. Add soft textiles like wool throws and linen curtains to balance the look.
4. Vintage Accents
Incorporate vintage or antique pieces to enhance the rustic vibe. Think old lanterns, vintage signs, and worn leather furniture. These pieces add character and a sense of history to your space.
5. Soft Textiles
Balance the rough cladding textures with soft textiles. Add cosy rugs, fluffy pillows, and warm throws to soften the look. Textiles in natural fibres like cotton, wool, and linen work best. They add warmth and comfort to your home.
6. Natural Elements
Include elements like plants, wooden furniture, and stone accessories. These help to make your space feel fresh and lively. Plants add a welcome touch of greenery and purify the air. At the same time, wood adds warmth and a natural touch.
7. Lighting
Use warm lighting to enhance the cosy feel. Think Edison bulbs, wrought iron chandeliers, and soft, ambient lighting. Avoid harsh, bright lights. Instead, choose soft, yellow-toned bulbs. They create a warm, inviting atmosphere.
Combining Shiplap and Board and Batten
You don’t have to choose just one style of wall cladding. Shiplap and board-and-batten can work well together. Use shiplap on one wall and board-and-batten on another. This mix adds variety and interest to your home.
Tip: Use shiplap on the walls and board and batten on the ceiling. This creates a unique, layered look. The contrast between the two styles adds depth and character. It’s a great way to make a statement in any room.
Combining these styles works well in open-plan spaces. It helps define different areas. Use shiplap in the living area and board and batten in the dining area. This creates a visual separation without needing walls.
Creating a Focal Point
Wall cladding can create a focal point in any room. Use shiplap or board and batten to draw attention to a specific area. For example, create an accent wall behind your bed. This adds depth and makes the bed the focal point.
Tip: Use board and batten to frame a fireplace; this draws attention and adds a touch of elegance. Shiplap works well as a backdrop for artwork or a gallery wall. It adds texture and makes the artwork stand out.
Focal points make rooms feel more organized and intentional. They guide the eye and create a sense of balance. Use wall cladding to highlight your home’s best features.
Conclusion
Interior wall cladding is a fantastic way to create a rustic chic look in your home. Whether you choose shiplap or board and batten, each option adds a unique charm. Remember to mix materials, stick to neutral colours, and add plenty of texture. You are well on your way to transforming your home into a cosy, rustic retreat.
View our full range of Wall Cladding products
New styles added regularly!
Wood has been used in construction for centuries. It is a versatile and attractive material that adds warmth and character to buildings. Recently, there has been a renewed interest in using wood for wall cladding due to its environmental benefits. Below, we will explore the sustainability of wood cladding, focusing on using eco-friendly materials and practices.
Understanding Wall Cladding
Wall cladding refers to covering the exterior or interior walls with another material. This serves both aesthetic and functional purposes. Protecting the structure from the elements, improving insulation, and the building’s overall appeal. While many materials are available for wall cladding, wood stands out for several reasons.
The Sustainability of Wood
One of the leading environmental benefits of wood cladding is that it is a renewable resource that replenishes naturally over time. When harvested responsibly, wood can be an eco-friendly option for construction.
1. Renewable Resource
Forests can be managed sustainably to ensure a continuous supply of wood. This involves selective logging, where only certain trees are harvested, and replanting to replace what is taken. This way, the forest can thrive and provide resources for future generations.
2. Carbon Absorption
Trees help reduce greenhouse gasses in the atmosphere by taking in carbon dioxide as they grow. When trees are used for construction, the carbon they have stored is locked in the wood, making wood cladding a carbon-positive choice.
3. Energy Efficiency
Wood cladding production requires less energy than other materials like steel or concrete, lowering its carbon footprint. Because of its natural insulation properties, choosing wood also helps to reduce the energy needed to manage a building’s temperature, further contributing to its environmental benefits.
Eco-Friendly Practices in Wood Cladding
Using wood can be even more sustainable when eco-friendly practices are followed. Here are some ways to ensure the timber used is as environmentally friendly as possible.
1. Certified Sustainable Wood
Look for wood certified by organisations like the Forest Stewardship Council (FSC). An FSC certification ensures that wood comes from responsibly managed forests, prioritising environmental, social, and economic sustainability. All Panelling Direct materials are FSC-certified, so you can be sure you are buying responsibly sourced wood when you shop with us.
2. Non-Toxic Finishes
Traditional wood finishes can contain harmful chemicals that can off-gas into the environment. Opting for non-toxic, water-based finishes helps to reduce the environmental impact. These finishes are safer for both the building’s occupants and the planet.
Advantages of Wood Cladding
1. Aesthetic Appeal
Timber cladding adds natural and timeless beauty to buildings. Depending on the type of wood and the finish used, it can create various looks, from rustic to modern. Wood’s warmth and texture make it a popular choice for those looking to create a welcoming and comfortable atmosphere.
2. Durability
When properly maintained, wood cladding can be incredibly durable. Treatments and finishes can help to shield the wood from insects, moisture, and other environmental factors. Certain types of wood, such as redwood, have a robust natural resilience to decay and insects, making them ideal for exterior cladding.

3. Versatility
Wood is a versatile material that can be used in various ways. It can be cut, shaped, and finished to meet a project’s needs. Whether you are looking for horizontal, vertical, or diagonal cladding, wood can accommodate your design preferences.
4. Insulation
Wood can help improve a building’s energy efficiency thanks to its built-in insulating properties. It provides another layer of insulation that can make regulating a building’s temperature easier, reducing energy costs and resulting in a smaller carbon footprint.
Conclusion
The environmental benefits of using wood for wall cladding are significant. As a renewable resource that can sequester carbon, wood is a sustainable choice for construction. The ecological impact can be minimised by following eco-friendly practices such as certified sustainable or reclaimed wood and non-toxic finishes.
Besides its sustainability, it offers aesthetic appeal, durability, versatility, and natural insulation. These benefits make it a compelling choice for both residential and commercial buildings.
As we continue seeking more sustainable building practices, wood cladding stands out as an environmentally friendly option that does not compromise beauty or functionality. By choosing wood, we can create buildings that are not only stunning but also kind to our planet.
View our full range of Wall Cladding products
New styles added regularly!
Wood wall cladding is popular for indoor and outdoor spaces because of its natural aesthetic and warmth. However, to keep it looking great and lasting, you must take good care of it. Here are some simple tips to help you maintain your wood cladding.
1. Regular Cleaning
Exterior Cladding:
Due to dirt and weather exposure, outdoor wood needs regular cleaning. Clean it at least once a year with a soft brush and mild soap. Avoid using high-pressure washers, as they can damage the wood. Mix one bleach to four parts of water for tough stains or mould, and rinse well afterwards.
Interior Cladding:
Indoor panels should be dusted regularly. Occasionally, it should be wiped with a damp microfiber cloth (to prevent scratches). Avoid harsh chemicals or too much water.
2. Cladding Inspection and Repairs
Routine Inspections:
Check regularly for signs of damage, such as cracks, splits, or warping. Also, look for areas where the finish might be peeling or wearing thin.
Minor Repairs:
Use a good wood filler or epoxy to fill small cracks or splits. After it dries, sand it smooth and apply a matching stain or finish. Fixing minor issues quickly can prevent more significant problems later.
3. Protecting the Finish of Your Cladding
Sealing and Staining:
A protective sealant or stain is crucial to keep the wood looking good and resisting moisture and sunlight. For exterior cladding, use a water-repellent sealant or UV-resistant finish. Reapply every 2-3 years or as needed.
Painting:
If it is is painted, check for any peeling or chipping. Sand the area, apply a primer, and repaint with high-quality paint. Use paints suitable for wood surfaces and ensure proper ventilation.
4. Managing Moisture
Proper Ventilation:
Good ventilation behind the panels prevents moisture buildup, which can cause mould or rot. For outdoor cladding, consider a moisture barrier or rainscreen system. Ensure proper ventilation or use dehumidifiers if indoors, especially in damp areas like bathrooms.
Gutter and Drainage Systems:
Keep gutters clean to prevent water leaks from seeping into the wood. Make sure downspouts direct water away from the cladding and foundation.
5. Pest Control
Regular Checks:
Look for signs of pest infestations, such as termite tunnels or tiny holes from wood-boring beetles. If ignored, pests can cause severe damage.
Preventive Measures:
Use insect-repellent finishes or treatments to deter pests. Keep the surrounding area free from excessive vegetation and mulch. If you find severe infestations, call a pest control professional.
6. Seasonal Cladding Maintenance
Spring and Summer:
These seasons are ideal for cleaning and inspecting. Warm weather is perfect for applying sealants, stains, or paint. Fix any damage caused by winter weather at this time.
Fall and Winter:
Prepare for colder months by making sure the wood is well-sealed. Clean thoroughly and remove leaves or debris that might trap moisture. Repair any damage before winter.
7. Long-Term Cladding Care Strategies
Quality Materials:
Start with high-quality wood and finishes. Woods like cedar, redwood, and teak are naturally more resistant to decay and pests. High-quality finishes last longer and protect better.
Professional Maintenance:
Consider hiring professionals for tasks like staining, sealing, or extensive repairs. They have the tools and skills to do the job right, ensuring a longer lifespan.
Regular Updates:
Stay updated on new products and technologies in wood care. Advances in sealants, stains, and treatments can offer better protection and longer-lasting results.
Conclusion
Wood wall cladding involves regular cleaning, timely repairs, and protective treatments. Following these simple tips, you can keep yours beautiful and durable for years. With proper care, your wood cladding will enhance the look and value of your home, standing firm against time and weather.
View our full range of Wall Cladding products
New styles added regularly!
Remote work has changed how we use our homes, making dedicated office spaces essential. Spending more time in these spaces means creating a professional yet comfortable environment. DIY wood wall cladding is a great way to achieve this transformation. Wood adds elegance and warmth, creating an appealing backdrop that boosts productivity and well-being. Here’s a guide with tips and design ideas to help you upgrade your home office with wood wall cladding.
Why Choose Wood Wall Cladding?
Wood wall cladding offers many benefits:
1. Aesthetic Appeal: Wood has a timeless, natural look that fits various styles, from rustic to modern.
2. Acoustic Benefits: Wood absorbs sound, reducing noise and making a quieter workspace.
3. Durability: Properly treated wood is durable and can handle daily wear and tear.
4. Versatility: Wood cladding comes in many finishes, patterns and textures to match your chosen style and needs.
Getting Started: Preparation and Planning
Before starting your DIY project, careful planning is vital.
1. Evaluate Your Space: Decide which wall(s) you want to clad. Consider the room’s layout, existing decor, and how the cladding will fit with your furniture and equipment.
2. Select the Type of Wood: Choose wood that matches your office decor. Options include log lap cladding for a rustic feel, shiplap for a coastal vibe, or sleek panels for a modern look.
3. Measure and Calculate: Measure your wall’s dimensions to calculate the wood needed. Add 10% to your calculations to cover cutting and waste.
4. Gather Tools and Materials: You’ll need wood panels or planks, a saw, a level, nails or screws, adhesive, a measuring tape, and safety gear.
Design Ideas for Wood Wall Cladding
Log Lap Cladding for Rustic Elegance
Look: Create a cosy, cabin-like feel with log lap cladding. The rounded boards offer a natural, rustic charm.
Application: Install horizontally for a classic log cabin look, or mix with vertical sections for a unique design.
Tip: Staining the wood in warm, earthy tones enhances the natural grain and creates a welcoming atmosphere.
Shiplap for a Clean, Coastal Vibe
Look: Shiplap boards, often painted white or left natural, give a clean and airy feel.
Application: Install horizontally for a classic look or vertically to make the room feel taller.
Tip: Use contrasting colours on adjacent walls to add interest without overwhelming the space.
Modern Minimalism with Sleek Panels
Look: Choose smooth, wide wooden panels in a single colour for a modern, minimalist style.
Application: Align panels seamlessly for a sleek, uncluttered look.
Tip: Pick lighter wood tones like birch or maple to keep the room bright and spacious.
Textured Wood for Depth and Interest
Look: Add texture with wood in varying widths, depths, or finishes for a dynamic surface.
Application: Combine different types of wood or stains to create a standout feature wall.
Tip: Balance textured walls with simple furniture to avoid a cluttered look.
Step-by-Step Installation Guide
1. Prepare the Wall:
– Clean the wall, making sure it’s dry and free of protruding nails or screws. Remove any wallpaper or old paint.
2. Cut and Sand the Wood:
– Measure and cut the wood planks or panels to size. Be sure to sand any rough areas around the edges.
3. Create a Layout:
– Lay out the wood on the floor to plan the arrangement. This step is important for log lap cladding with its distinct profile.
4. Attach the Wood:
– Start at the bottom of the wall. Apply adhesive to the back of each panel and press it firmly against the wall. Use a level to ensure each plank is straight.
– Secure the wood with nails or screws. A nail gun can make this step quicker.
5. Finish the Edges:
– Trim excess wood around the edges with a saw. Fill gaps or nail holes with wood filler, then sand the filler smooth once it’s dry.
6. Seal and Protect:
– Sealant can be applied to guard the wood from moisture and wear. This step is crucial for home offices in humid areas or prone to spills.
Styling Your Cladded Office
Once your wood wall cladding is complete, it’s time to style your office:
1. Furniture: Choose furniture that complements the wood tones. Darker woods pair well with lighter furniture for contrast, while similar tones create a cohesive look.
2. Lighting: Use a mix of ambient and task lighting to highlight the wood’s natural beauty. Consider wall-mounted sconces or desk lamps with warm bulbs.
3. Decor: Add personal touches like framed artwork, plants, and organizational tools that blend with the wooden backdrop.
4. Ergonomics: Ensure your workspace is ergonomic. Invest in a high-quality chair, desk, and accessories that promote comfort and productivity.
Maintenance Tips
To keep your wood wall cladding looking its best:
1. Dust Regularly: Use a clean cloth or vacuum to remove dust and debris.
2. Avoid Excess Moisture: Wood can warp or mould if exposed to too much moisture. Use a dehumidifier if needed.
3. Touch-Up Scratches: Keep wood filler and stain on hand for quick touch-ups to any scratches or dents.
Transforming your home office with DIY wood wall cladding is a rewarding project that enhances looks and function. By choosing suitable high-quality materials and planning carefully, you can achieve a beautiful, inspiring space for work. Happy cladding!
View our full range of Wall Cladding products
New styles added regularly!